
Scope Adjustment — How to Set the Turrets
- Paws To Peaks

- Oct 12, 2025
- 7 min read
Updated: Dec 23, 2025
About the author.
Usually hits where he aims.
Enjoys learning, so takes teasing and short opinions about himself with humility, trusting the good intentions behind them. 😊

________________________________________
This text can serve as an aid for efficiently turning the scope turrets and thus applying corrections during LR shooting.
It is not a manual and will not replace practice with a good instructor. Some descriptions may seem too visual, but the repetition of questions at ranges shows a need for clear, unambiguous explanations.
The author has never competed in, nor won, any LR shooting contests, so what follows cannot be validated by a medal, diploma, or trophy.
________________________________________
What this covers
- Why turning the turrets matters and how it affects your hits
- How to check your zero
- How to correct scope settings after evaluating bullet holes
- How to take notes that help when turning the turrets

________________________________________
A few words to remember
Some values are rounded — they are not critical for mastering the described skills.
1 MOA — a circle 3 cm in diameter at 100 m (I'll explain why 100 m later)
1 MRAD or MIL — a circle 10 cm in diameter at 100 m
1 click (klick) — a single click of a turret that shifts the reticle
Scopes have reticles marked in MOA or MRAD. That determines how we will correct settings with the turrets after checking the target holes. As far as I know, we use MRAD reticles, so I'll describe corrections in that system.

________________________________________
1 MOA — The basic unit
1 MOA equals a 3 cm circle at 100 m. At greater distances the angular size stays the same, but the target area increases:
To visualise it, imagine shining a flashlight on a target. From close up the light circle is small; as you step back it grows — the beam angle stays the same. We treat group size on the target the same way.
Distance | 1 MOA = | ½ MOA = |
100 m | 3 cm | 1.5 cm |
200 m | 6 cm | 3 cm |
300 m | 9 cm | 4.5 cm |
400 m | 12 cm | 6 cm |
500 m | 15 cm | 7.5 cm |
1000 m | 30 cm | 15 cm |
Therefore ½ MOA at 100 m is 1.5 cm, but at 500 m it is 7.5 cm.
Make sure you understand why before you continue. 😊

________________________________________
1 MRAD (MIL)
MRAD — milliradian, commonly called MIL.
1 MIL = 10 cm at 100 m.
At 300 m = 30 cm; at 800 m = 80 cm.
Important: 0.1 MIL = 1 cm at 100 m, 2 cm at 200 m, 3 cm at 300 m, 10 cm at 1000 m.
________________________________________
1 Click
If your scope's turrets are graduated in 0.1 MRAD, each click on the turret shifts the impact by 1 cm at 100 m.
At 300 m it's 3 cm; at 500 m it's 5 cm.
Check how your turrets are scaled before you proceed. 😊

________________________________________
Checking zero
Always check how your bullets are flying that day.
Many variables affect it, so it's best to fire a few shots at 100 m before the main session. This sets the baseline corrections for the day.
Most LR rifles are zeroed at 100 m. In ideal conditions, with perfect ammo and a perfect shooter, with turrets at zero, aiming at the centre at 100 m will hit dead centre.
Checking zero means determining how far from that ideal you are and applying turret corrections so you hit where you intend.

________________________________________
The first shot — everything looked fine but the hole isn't perfect
The most common reason: a cold bore or a cold shooter.
A clean, cool barrel behaves slightly differently for the first shots; a shooter who hasn't fired in a while should do a few dry-fire repetitions to get muscle memory back. Usually both factors play a role.
Some targets even have a dedicated "zero" or "cold bore" box for that first hit.
________________________________________
How many shots to check zero?
Three — if they land close together.
If not, shoot four-shot groups; it's easier to find the mean point of impact (MPI) and use it to adjust the turrets.
If your group looks like this and both turrets are at zero, don't change anything — that's your verified zero for the day.
________________________________________
Accuracy vs. Precision
Accuracy = hitting where you aim (e.g., the central 10).
Precision = tight groups (each round close to the previous one).
If your group is slightly high, dial 1 click down (clockwise on the elevation turret).
That 1 cm may put you right into the bullseye.
If the next group looks the same, you can safely assume your zero is confirmed.

________________________________________
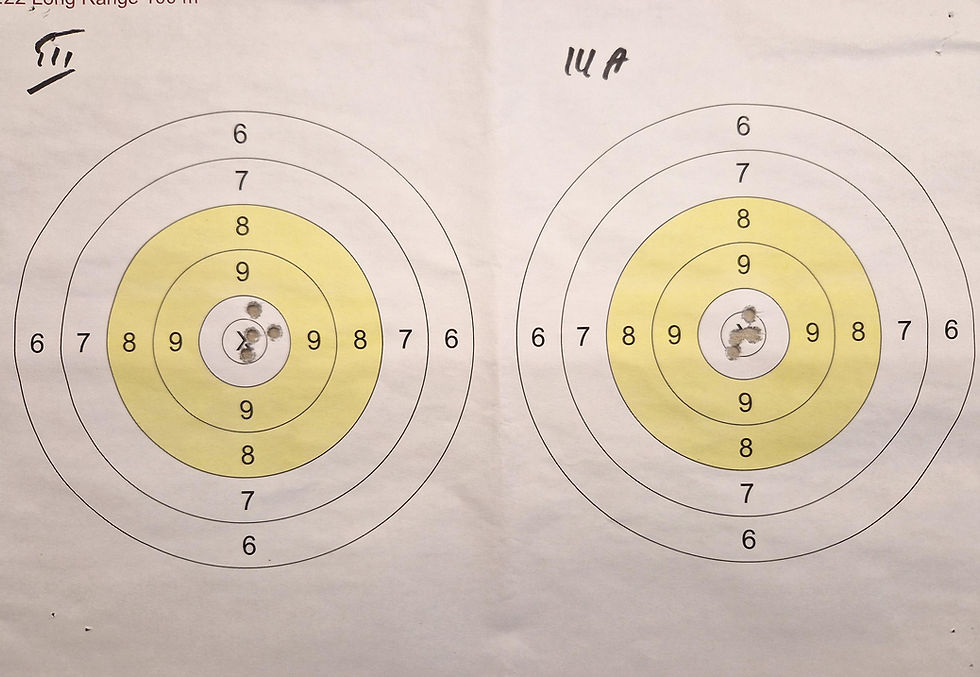
When the group isn't one ragged hole
Before you learn to estimate corrections by eye, try this:
Connect any two bullet holes with a line, then the other two. Find the midpoints of each line, connect them and mark the centre — that's your MPI.

Use the photo below and assume that the target was 100 metres away, not 500 metres away. Suppose your MPI (X) is 5 cm left and 1 cm high of the target centre at 100 m.
You need to move the group 5 cm right and 1 cm down.
On most scopes, the right-side turret controls windage.
To move impacts right, click in the direction marked R (RIGHT) — usually counter-clockwise.
So: 5 clicks right, 1 click down (top turret, clockwise).
Fire another four-shot group — the MPI should be centred. 😊
If so, that day's zero is 0.5 R / 0.1 D, and you'll apply that correction to other distances.

________________________________________
Useful terms
UP / DOWN — elevation corrections
LEFT / RIGHT — windage corrections
When sharing adjustments with someone else, give them in MILs, not clicks — their turret scaling may differ.
So the earlier example would be 0.5 R on a 500 m target, or 0.5 R / 0.1 D at 100 m.
________________________________________
At longer distances
The further you shoot, the more factors matter.
Avoid changing settings after every group — you might be chasing noise instead of fixing an error.
Three to five groups per distance usually tell the real story.

________________________________________
Keeping notes — because memory lies
My "zero" entries look like this:
1/0/0 1/0/0 — left block for elevation, right for windage.
Example after shooting at 100 m:
before: 1/0/0 1/0/0
from target: 9/9/9 1/0/5R
next series then starts as:
9/9/9 1/0/5R
If everything lines up, I note:
9/9/9 1/0/5R → 9/9/9 1/0/5R
Meaning: nothing to change — keep shooting.

Record what happened — there's a long walk between the target and the firing point and you can easily forget details that affect corrections.
You can take a photo of the target or write a short description — the key is that you can quickly read information that makes sense to you.
If you work as a team, agree on a common format. That way the notes will "speak" the same language to each team member and be easy to use under pressure.
For longer distances, say 1000 m, a correction might read:
2/3/9 9/9/5L, which equals 13.9 U / 0.5 L.
I omit up/down and left/right signs — positive is up/right, negative down/left.
Alternative notation works too:
0/0/1D 0/0/5R, or simply 0.1 down / 0.5 right — as long as it's clear and consistent.

________________________________________
Quick reference table — MOA and MIL at common distances
Distance | 1 MOA = cm | 0.5 MOA = cm | 0.1 MIL = cm | 1 MIL = cm |
100 m | 3 | 1.5 | 1 | 10 |
200 m | 6 | 3 | 2 | 20 |
300 m | 9 | 4.5 | 3 | 30 |
400 m | 12 | 6 | 4 | 40 |
500 m | 15 | 7.5 | 5 | 50 |
800 m | 24 | 12 | 8 | 80 |
1000 m | 30 | 15 | 10 | 100 |
_

_______________________________________
Good luck — and may your turrets always tell the truth.
If you want real progress, train under the supervision of an experienced instructor — nothing replaces a second pair of eyes on your fundamentals.


Comments