top of page

Microspikes or Crampons? A Simple Winter Guide

  • Writer: Paws To Peaks
    Paws To Peaks
  • 4 days ago
  • 5 min read

Microspikes, strap-on crampons, semi-automatic crampons

What should a non-expert wear in the mountains - not necessarily high ones?

In winter mountains, crampons and trekking poles are essential.

It doesn’t have to be “ice rink” conditions for things to go wrong. Most cities are better at clearing pavements now. But once you’re closer to the mountains, winter surfaces change fast.

A slip can end with an awkward laugh. Or a sprain. And if the terrain has any exposure, it can end much worse.

Let’s keep this simple: three tools, three different jobs.

Microspikes (raczki)

These are the most common anti-slip solution. People use them in town, and more and more often on easy mountain trails. Funny detail: you’ll also see them at outdoor shooting events in winter.

Microspikes fit almost any boots and significantly improve grip on slippery ground in less demanding conditions.

Microspikes are small points connected with chains (or straps), held by a stretchy rubber/silicone harness. You can put them on almost any footwear: hiking boots, winter boots, even some sporty shoes.

A flexible harness made of thick silicone, resistant to frost and salt, is easy to use: stretch it, pull it over the boot so the spikes sit under the sole, align it - and you’re done.

Putting them on takes seconds. No “left/right”. Just check the chains aren’t twisted, stretch the harness over the boot, and you’re done.

The grip difference can be dramatic. Even on hard ice. First time feels almost weird - so take a few careful steps before you start walking like you’re on dry asphalt.


Good-quality microspikes improve safety not only on easy mountain trails, but also during many activities on slippery, frozen ground.

Where microspikes make sense

  • city streets and paths

  • wide winter roads

  • flat or gently rolling approach trails

  • packed snow, lightly iced terrain

Where microspikes stop being a good idea

  • when your boot sinks into snow and you can’t see what’s underneath

  • icy rocky trails (ice + stone steps + uneven edges)

  • anything steep

A small, flexible case for carrying microspikes - easy to slip into a jacket pocket.

Is it better to have microspikes than “naked boots”? That’s the wrong question. If you plan a winter mountain walk, plan to carry crampons.

Microspikes are a helpful tool. They are not a plan for winter in the mountain.

Packed snow - where your boots don’t sink in - along with approach tracks and easy trails are exactly the conditions where microspikes work best.

Strap-on crampons (raki koszykowe)

The name sounds harmless. The tool is not.

Strap-on crampons are full-size crampons for real winter terrain.

Deeper snow and a wide range of terrain - from the easy stuff where microspikes still work, to more serious winter approaches - are where strap-on crampons really shine.

Their big advantage is fit: they work with many mountain boots, including boots that are not fully rigid.

They come in two parts (front and rear), connected by a bar that lets you adjust length. You set the distance so the boot sits exactly between the two sections.

Strap-on crampons have much more aggressive, larger points than microspikes, and compared to semi-automatic crampons the main difference is simply how they attach to the boot.

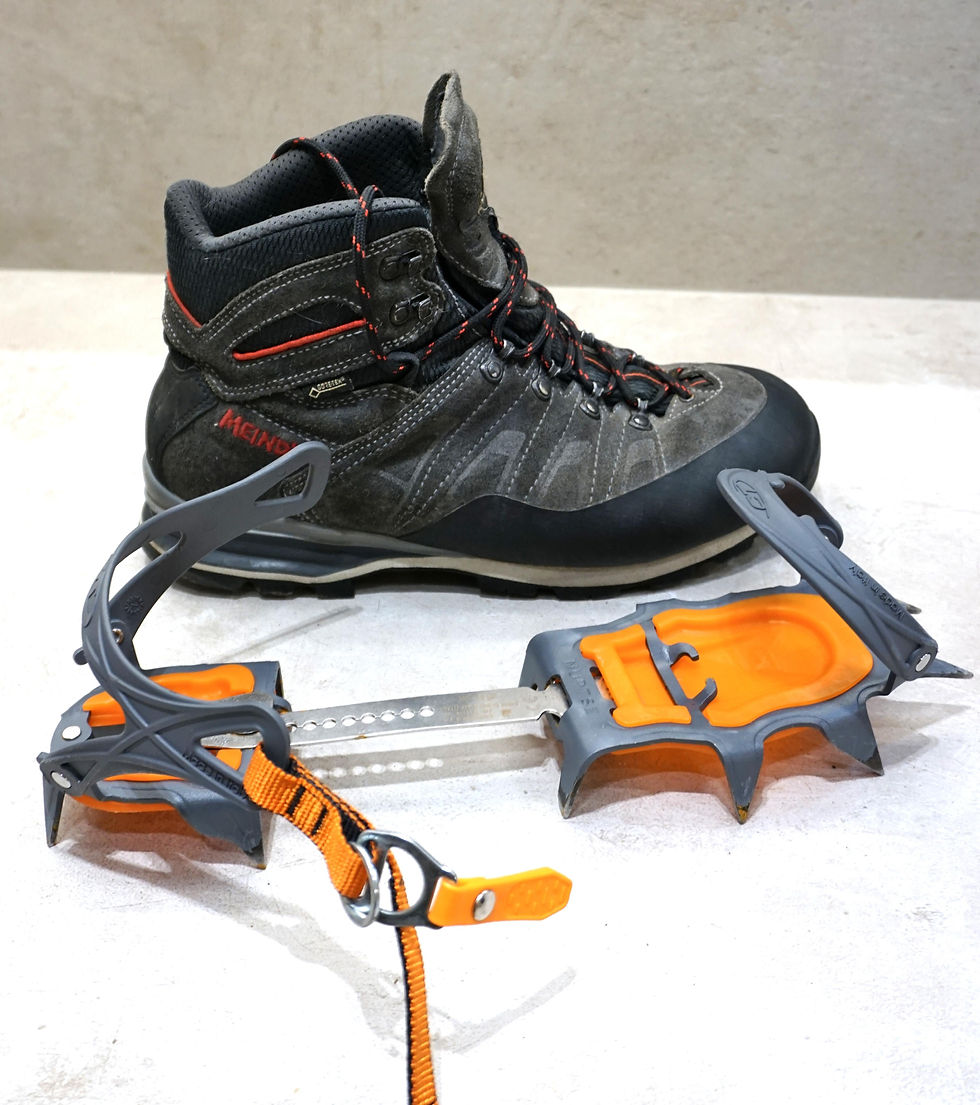
Different brands use slightly different binding details, but the idea is the same:

  • a plastic toe basket

  • a heel basket

  • a strap that wraps and locks the boot down

The strap threading is not a place for improvisation. Use the manufacturer’s way. Always.

The biggest advantage of strap-on crampons is that they fit almost any hiking boots. They work well even with softer soles, while semi-automatic crampons require boots with stiff soles.

Where strap-on crampons work

  • hard-packed snow

  • deep snow (yes, also there)

  • icy trails

  • rocky trails covered with ice

  • summit sections, both up and down

They are not for ice climbing. But we’re talking about hiking, not climbing.

Winter approaches in very low temperatures are safer in stiff boots with enough room for proper foot insulation. A stiff sole also allows you to use semi-automatic crampons.

Semi-automatic (hybrid) crampons (raki półautomatyczne)

These need the right boots.

Semi-automatic crampons require boots with a stiff (or very stiff) sole and a heel welt - a rear ridge that the heel lever can lock onto.

On the left: a stiffer boot with a heel welt (just above the yellow rand) that allows semi-automatic crampons to clip on. On the right: a typical mountain hiking boot.

This usually appears when conditions get colder and harder: low temperature, serious ice, or sections where you’re stepping on firm frozen surfaces.

On the left: a winter hiking boot with a stiff sole (for semi-automatic crampons). On the right: a multi-season hiking boot (for strap-on crampons).

The front is typically a toe basket (similar to strap-on crampons).The back is a heel lever - a quick, secure latch, often with some adjustment (for example a screw that sets how tight it clamps).

Semi-automatic crampons with the characteristic rear heel clip, a bit like a simple ski binding. The front Semi-automatic crampon heel lever.basket is the same as on strap-on crampons.

Length adjustment is the same concept as before: you set the front and rear sections so they match your boot.

Semi-automatic crampon heel lever.

Two small upgrades that matter

Anti-balling plates (anti-snow plates)If you use strap-on or semi-automatic crampons, you really want these. They reduce snow “balling up” under your boot - which can turn your crampons into skis at the worst moment.

The orange anti-balling plates are a very effective way to stop snow from packing between the crampons and the boot sole. If your crampons don’t come with them, it’s best to get a set before your first use.

Trekking poles + snow baskets Poles help balance. They also save your legs on long descents. In snow, add snow baskets so the poles don’t punch straight through.

Depending on the route, you’ll typically pair crampons with an ice axe or trekking poles.

TIP: gaiters (stuptuty)

When you wear crampons, gaiters are not a fashion choice.

They keep snow out of your boots, keep the ankle area warmer, and protect your pants. Because sooner or later, your crampon will catch your own leg. It happens. In awkward terrain, even to careful people.

Better to cut a gaiter than your pants.

Properly matched to stiff-soled boots, semi-automatic crampons go on quickly. The layout and length of the points are no different from those on strap-on crampons.

Quick decision guide

Not sure what to buy? Start with your boots.

  • Very stiff sole + heel welt → semi-automatic (hybrid) crampons can be a good choice.

  • Stiff-ish boots, no clear heel welt, or you’re not 100% sure → strap-on crampons. They fit the widest range and many people never “outgrow” them.

  • No mountain boots, but you want an easy winter walk (example: the paved approach to Morskie Oko in the Tatra Mountains) → microspikes are a sensible choice for that specific plan.

The rear heel lever on semi-automatic crampons, with the serrated orange adjustment wheel for fine-tuning the closure tension.

Every winter, rescue teams help people who went too far on microspikes. Not because they were reckless - often because they simply didn’t know where the line is.

Safe crampon packing is simple: fold them points-to-points, flipped so the heel of one meets the toe of the other. Then wrap everything with the same straps you use to fasten them to your boots, and slide the bundle into the crampon bag.

Winter mountains are not a place for experiments. You can be a beginner and still make professional choices: carry crampons and poles, and don’t treat microspikes as a universal solution.

Packed in their carry bag, strap-on and automatic crampons take up about the same amount of space. A microspikes case is definitely smaller.

If you don’t know how to match boots, crampons and poles - don’t buy anything yet. A basic winter hiking course can be the best investment. You’ll try different setups, learn how to use them properly, and instructors are often experienced mountain rescuers.

In winter, microspikes live in our small daypack. For mountain trips, crampons join the kit - packed in their own bag.

Comments


FOLLOW US ON INSTAGRAM

paws1.jpg

ABOUT US

Three paws. Three hearts. One quiet path.
Some trails guide.
This one teaches without saying a word.


Read More


Subscribe to our newsletter • Don’t miss out!

bottom of page